ドキュメントサイトの作成
このガイドでは、Docsbookで最初のドキュメントサイトの設定方法を説明します — コーディングの経験は必要ありません。各ステップにはスクリーンショットが含まれているため、常にどこをクリックすればよいか正確にわかります。
必要なもの#
始める前に、以下のものがあることを確認してください。
- インターネットアクセスのあるコンピューター — どのOSでも動作します (Windows, Mac, Linux)
- 無料のGitHubアカウント — ドキュメントファイルがここに保存されます
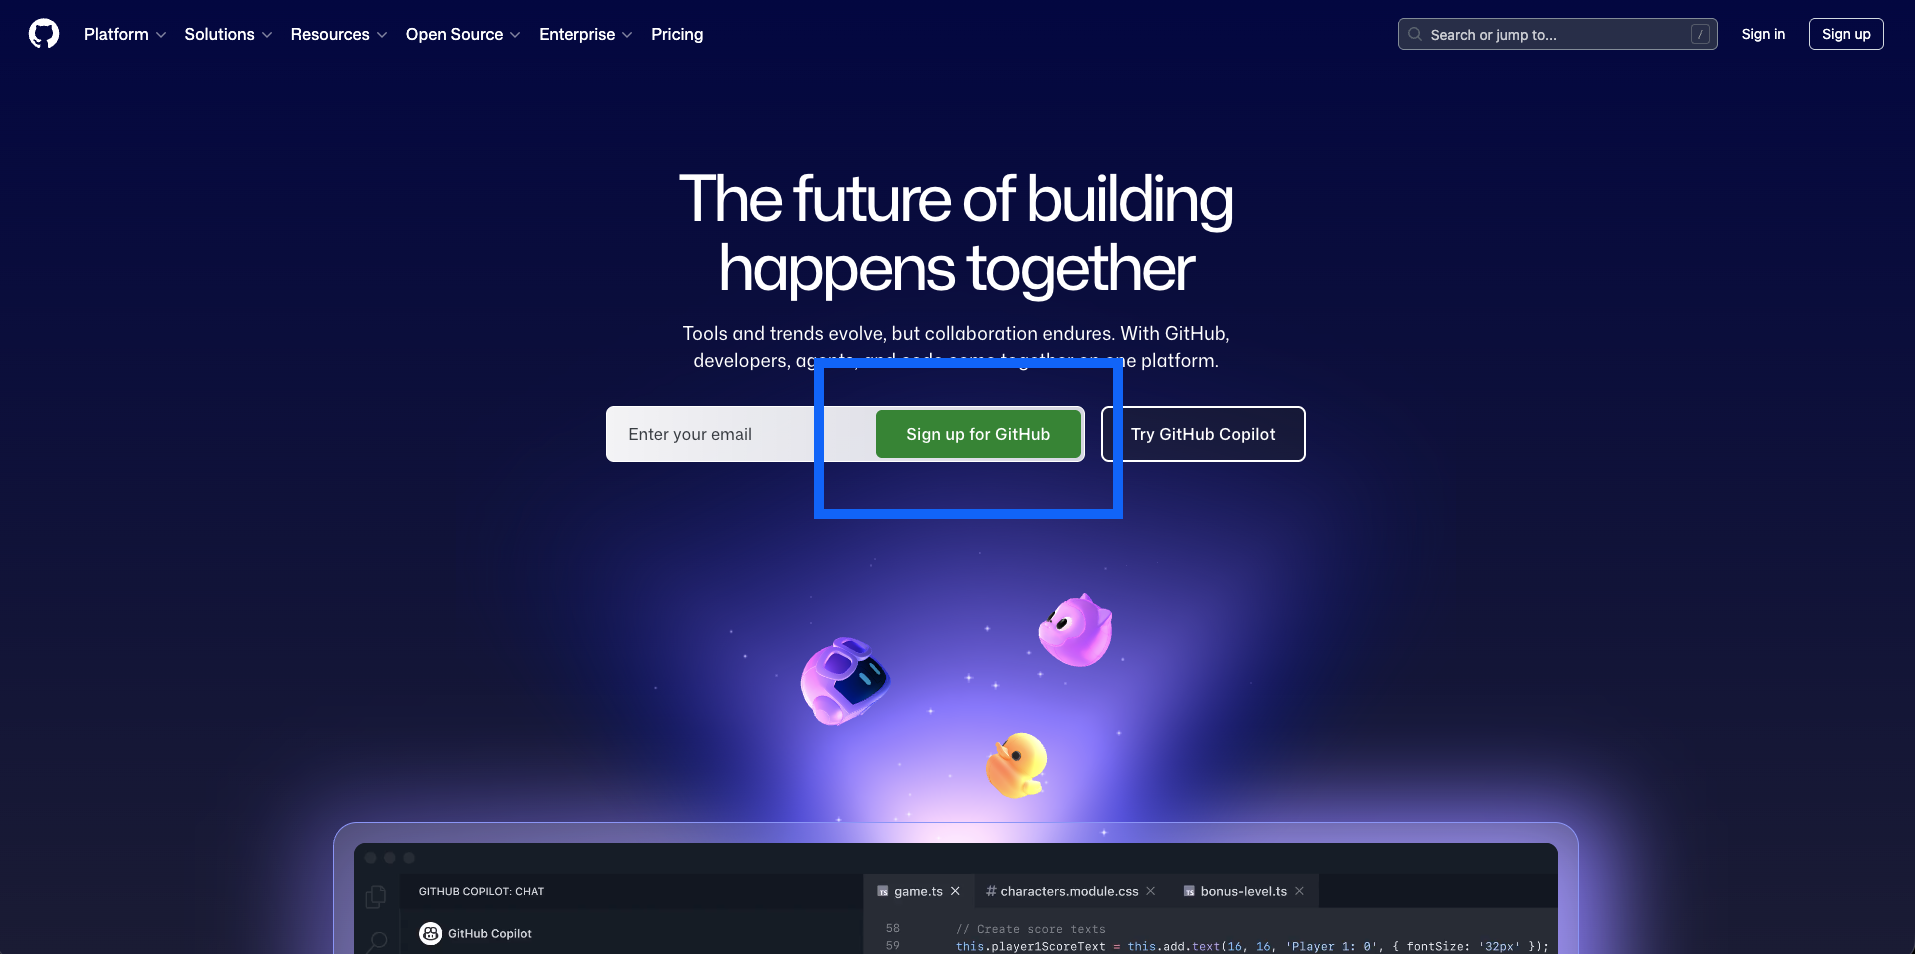
まだGitHubアカウントをお持ちでない場合は、github.com にアクセスして、Sign up をクリックしてください — 無料で、約2分で完了します。
GitHubとは? GitHubは、人々がファイルを保存および共有する人気のウェブサイトです — 特にドキュメントやソフトウェアプロジェクト向けです。Google Driveのようなものですが、テキストファイルとコード用に特別に設計されています。DocsbookはGitHubからファイルを読み取り、美しいドキュメントウェブサイトに変換します。
ステップ 1 — GitHub アカウントの作成 (すでにアカウントをお持ちの場合はスキップ)#
- github.com にアクセスします
- 右上の Sign up をクリックします
- メールアドレスとパスワードを入力します
- ユーザー名を選択します — これはドキュメントの URL に表示されます (例:
docsbook.io/your-username/your-repo) - メールアドレスを確認します
ステップ 2 — ドキュメント用のリポジトリを作成する#
リポジトリとは? リポジトリ(または「repo」)は、GitHub 上のフォルダのようなものです。ドキュメントファイルをすべて保存します。ドキュメントサイトごとに 1 つのリポジトリが必要です。
Option A — Start with an Example (Recommended for beginners)#
The easiest way to get started is to copy one of our ready-made example repositories. This is called forking — it creates your own personal copy of the repository that you can freely edit.
-
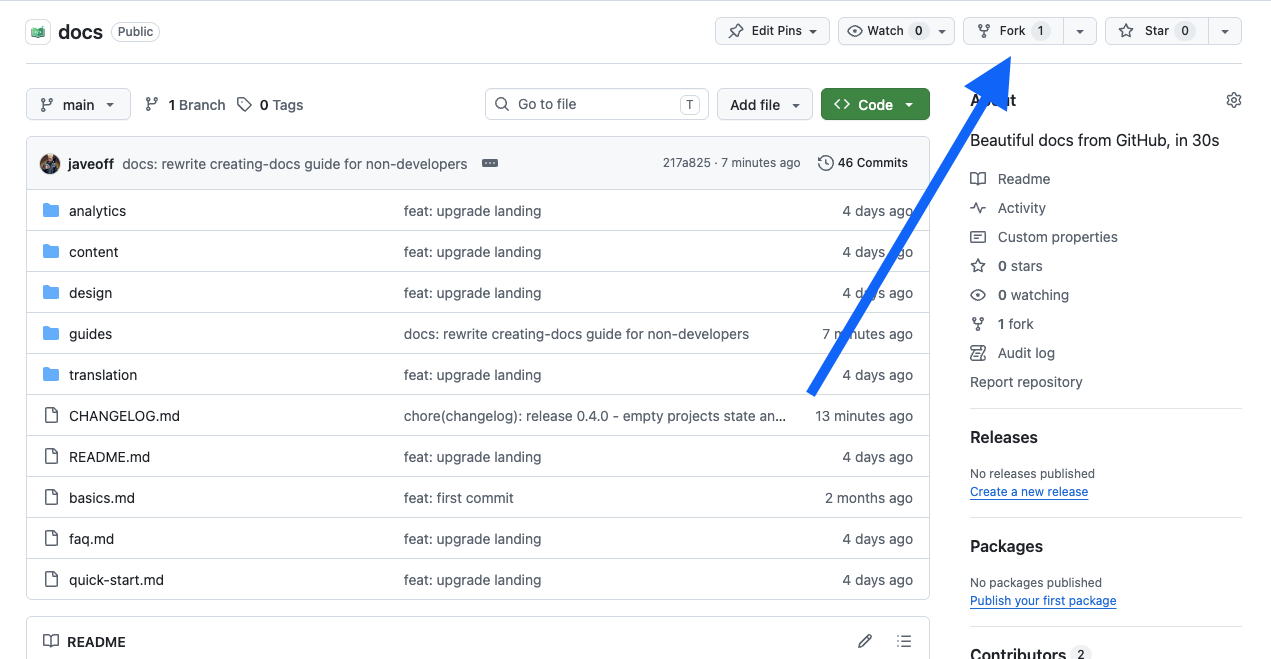
You'll see a page with files and a description
-
Click the Fork button in the top-right corner of the page
What does Fork mean? "Forking" means making your own personal copy of someone else's repository. It's like pressing "Duplicate" on a Google Doc. Your copy is completely independent — changes you make won't affect the original.
-
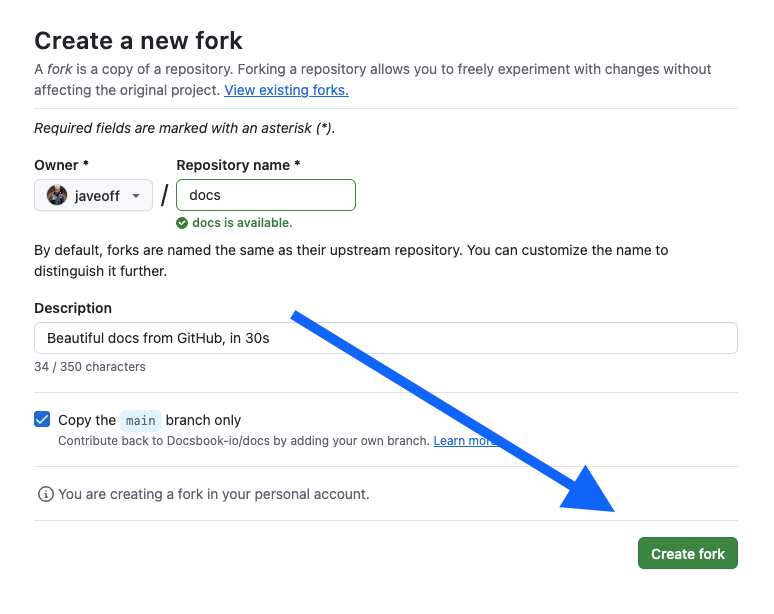
A dialog appears. Leave all settings as they are and click Create fork
-
After a moment, GitHub takes you to your new repository at
github.com/YOUR-USERNAME/docs
Done! You now have a repository with example documentation files ready to edit.
Option B — Start from Scratch#
If you prefer to begin with a blank slate:
-
Make sure you're signed in to GitHub
-
Go to github.com/new

-
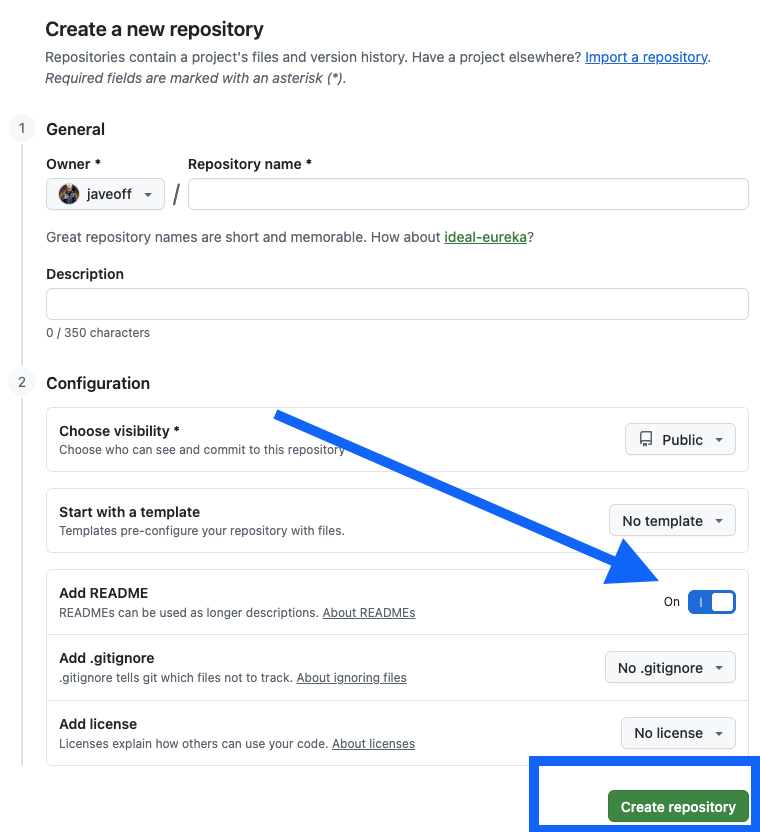
Fill in the form:
- Repository name — choose a short name with no spaces, e.g.
my-docsorproduct-docs - Description — optional, a brief description of what this is
- Visibility — select Public (Docsbook requires public repositories)
- Check Add a README file — this creates your homepage
- Repository name — choose a short name with no spaces, e.g.
-
Click Create repository
-
Your new repository opens. It contains one file:
README.md
ステップ3 — リポジトリをDocsbookに接続する#
GitHubリポジトリができたので、ドキュメントサイトを作成するためにDocsbookに接続しましょう。
-
に移動します: docsbook.io/connect
-
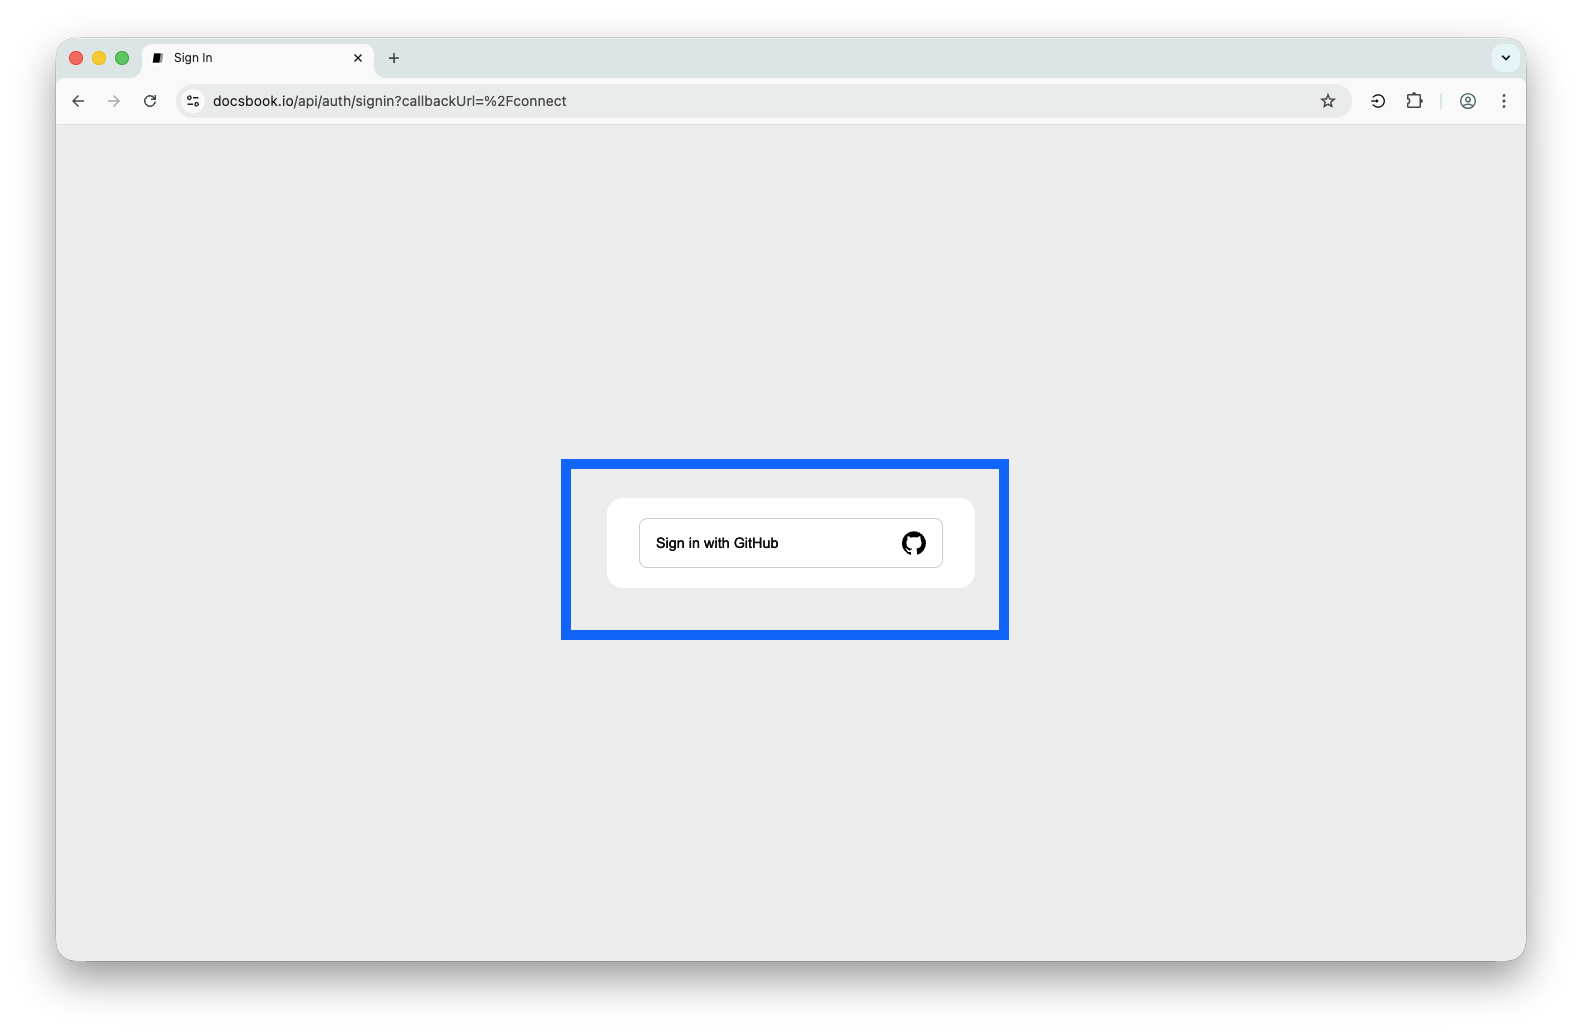
Sign in with GitHubをクリックします
-
GitHubはDocsbookを承認するように求めます。Authorize docsbookをクリックします
Docsbookはリポジトリのファイルのみを読み取ります — 何も変更したり削除したりすることはできません。
-
リポジトリのリストが表示されます。先ほど作成したものを探し、クリックします
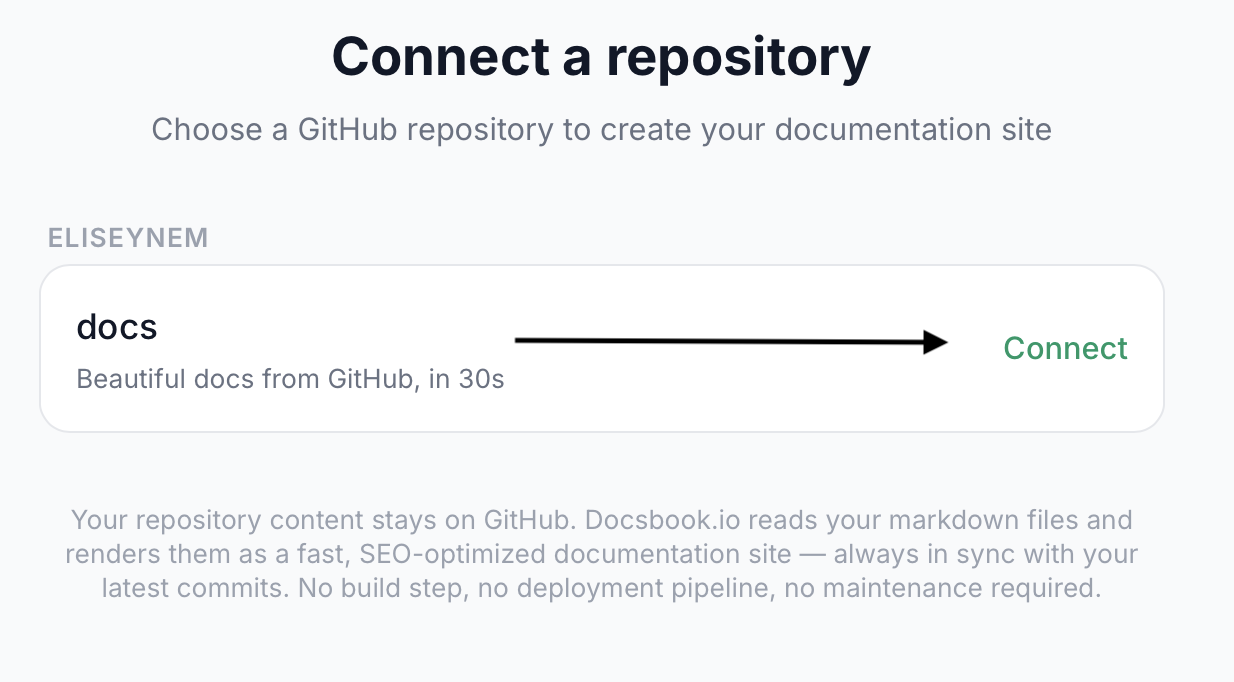
-
Docsbookはドキュメントサイトを作成します。自動的にリダイレクトされます。
ドキュメントサイトは次のURLで公開されています:
docsbook.io/YOUR-GITHUB-USERNAME/YOUR-REPO-NAME
ステップ 4 — ドキュメントの編集#
ドキュメントファイルを編集する方法は3つあります。最も使いやすい方法を選んでください。
Option A — Edit Directly on GitHub (Easiest, no setup needed)#
This is the simplest method. You edit files right in your browser on GitHub — no software to install.
Edit an existing page#
-
Go to your repository on GitHub (e.g.
github.com/YOUR-USERNAME/docs) -
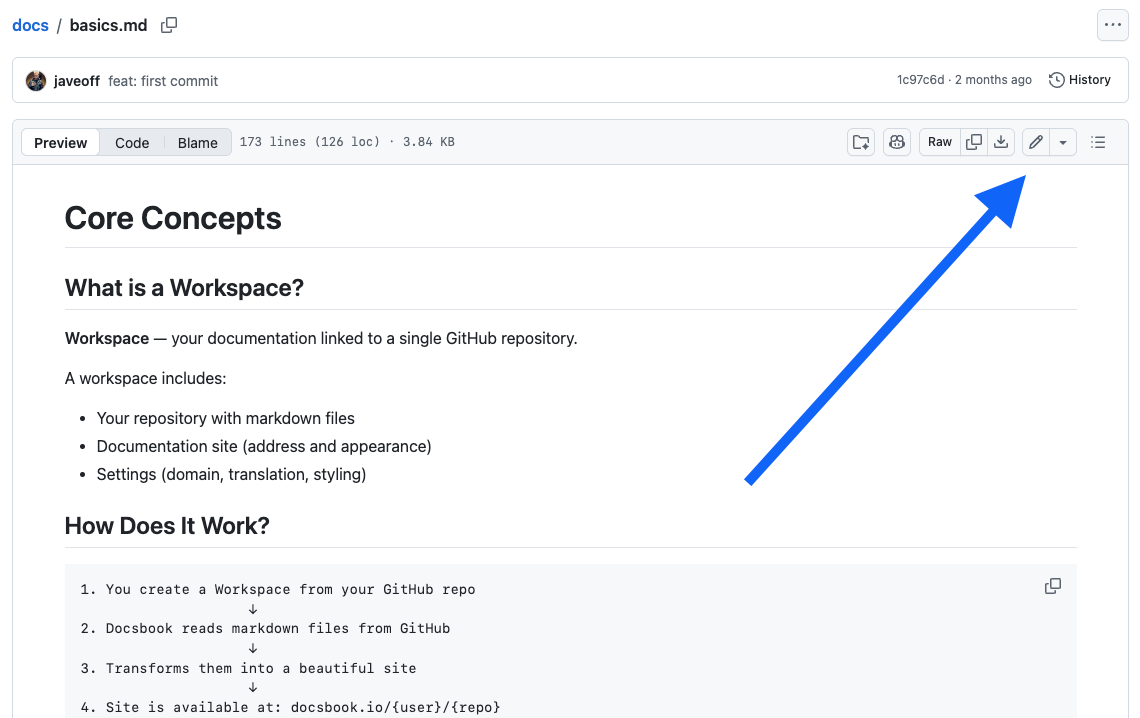
Click on the file you want to edit, for example
README.md
-
Click the pencil icon (✏️) near the top-right of the file content
-
The file opens in an editor. Make your changes.
Your documentation uses Markdown — a simple way to format text. For example:
**bold**becomes bold,# Headingbecomes a large heading. See the Markdown guide below for more.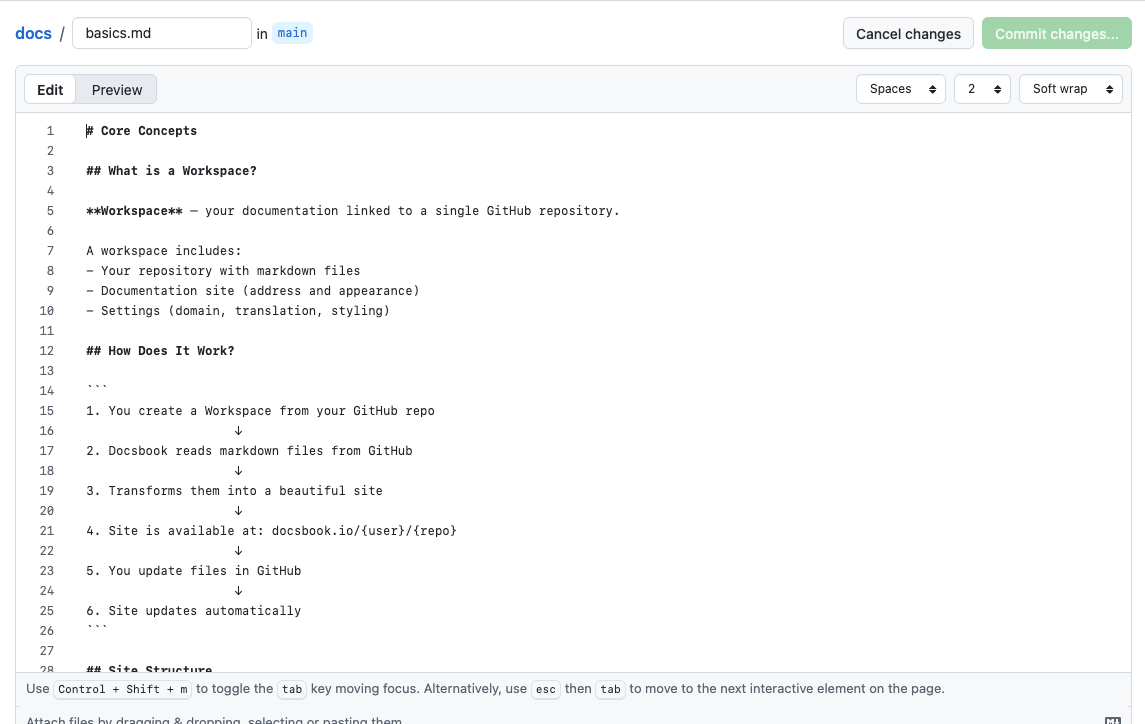
4.1 Learn how to edit Markdown files with pretty customization
-
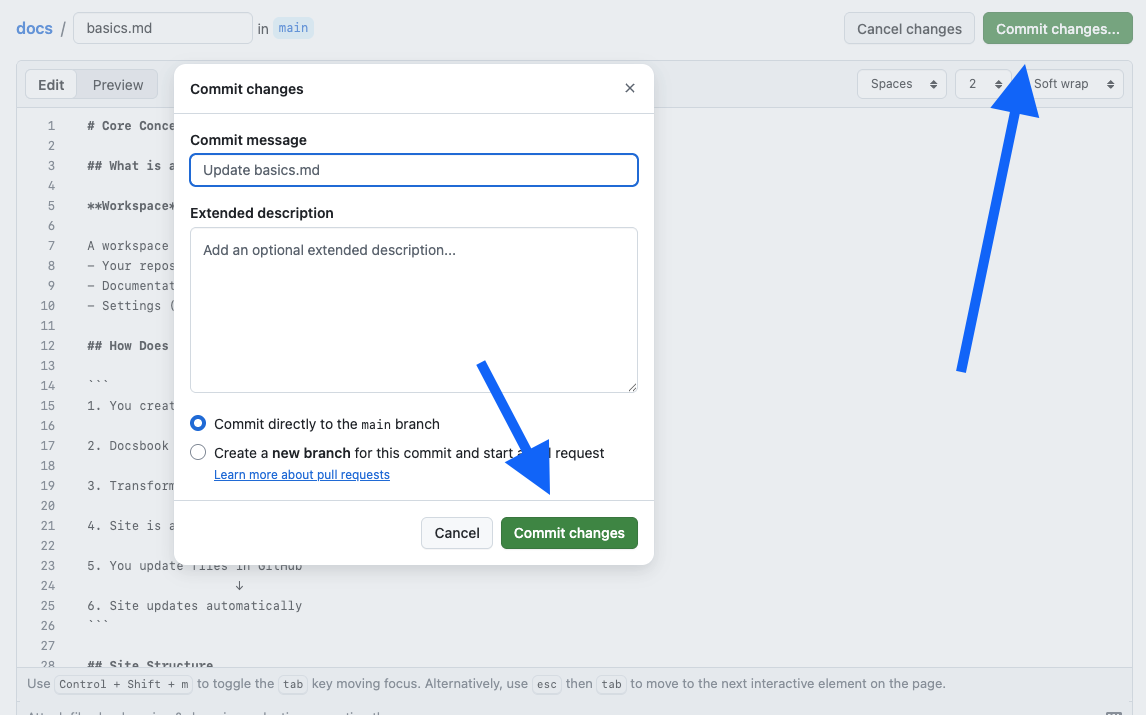
When you're done editing, scroll down to the Commit changes section
-
Optionally, write a short note describing what you changed (e.g. "Update introduction")
-
Click Commit changes
-
Go back to your Docsbook site and refresh — your changes appear immediately.
Add a new page#
-
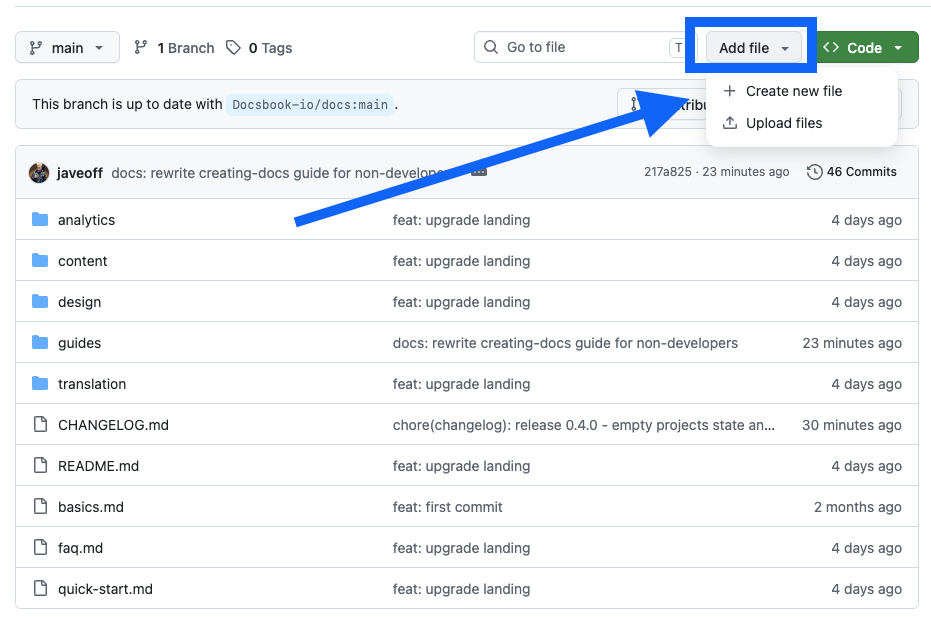
Go to your repository on GitHub
-
Click Add file → Create new file
-
In the Name your file field, type the path and filename. For example:
guides/installation.mdTyping a
/in the name automatically creates a folder. For example,guides/installation.mdcreates aguidesfolder withinstallation.mdinside.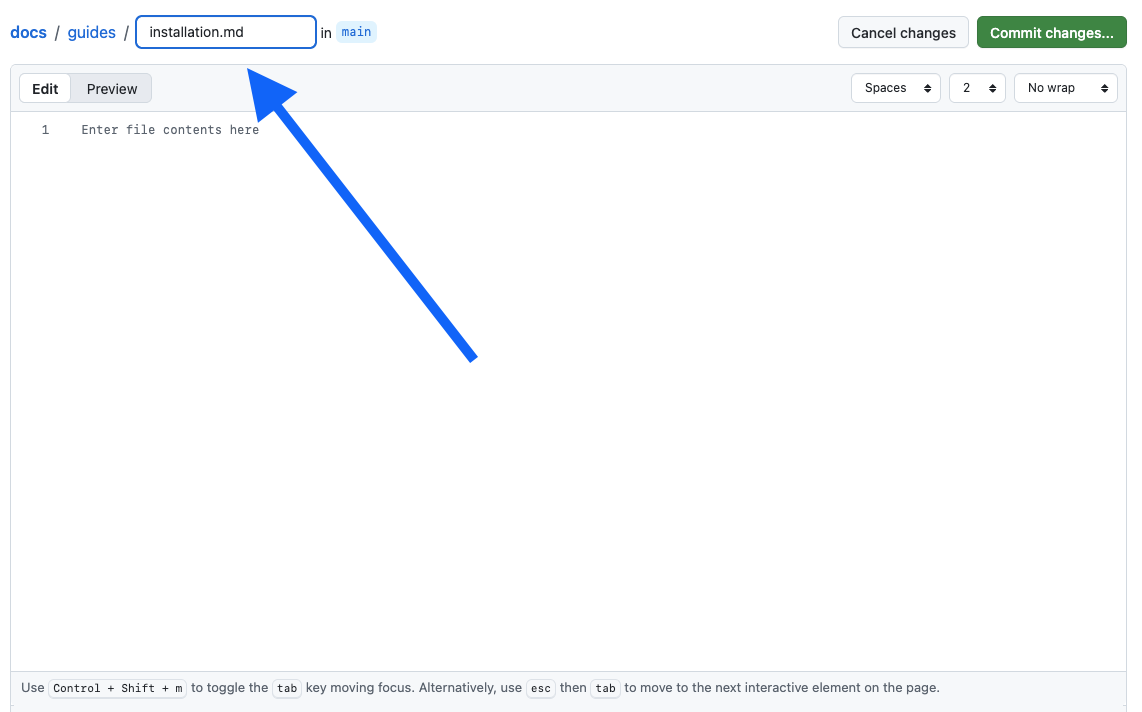
-
Write your content in the editor below
-
Click Commit new file
The new page appears in your Docsbook sidebar automatically.
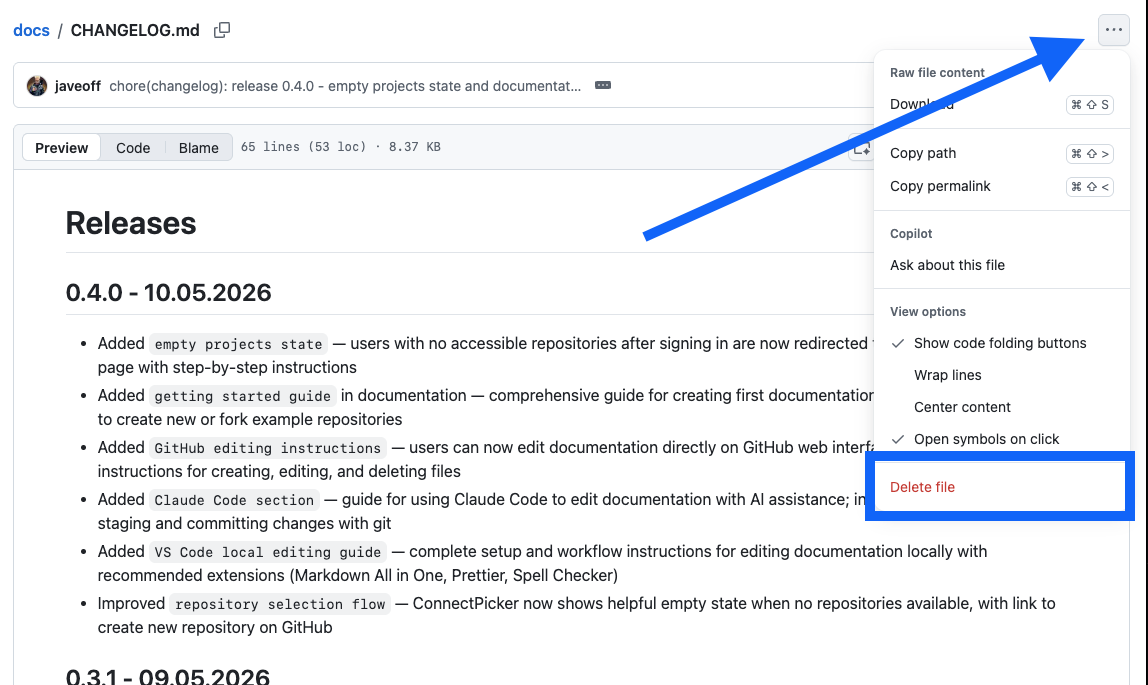
Delete a page#
-
Open the file in your repository
-
Click the ⋯ (three dots) menu icon near the top-right
-
Click Delete file
-
Click Commit changes to confirm
Option B — Edit with Claude Code (AI-assisted, no terminal needed)#
Claude Codeは、会話を通じてドキュメントファイルを読み書き編集できるAIコーディングアシスタントです。ターミナルコマンドやGitの知識は不要です。大量のコンテンツを迅速に生成したい場合に最適です。
Setup (one time)#
-
claude.ai/code にアクセスし、Claude Codeをダウンロードします。
-
画面の指示に従ってインストールします。
-
Claude Codeを開き、次のように言います。
"github.com/YOUR-USERNAME/YOUR-REPO-NAME のGitHubリポジトリを私のコンピューターにクローンし、開いてください。"
Claudeが残りの処理を行います。ターミナルは不要です。
Creating and editing documentation#
チャットパネルで必要な内容を記述するだけです。
新しいページを作成する
"
guides/installation.mdという名前の新しいファイルを作成し、始めに何をすべきかのガイドを含めます。システム要件、インストール手順、および最初のログインのセクションを含めてください。"
既存のページを編集する
"
guides/quick-start.mdを開き、最後にトラブルシューティングセクションを追加してください。5つの一般的な問題と解決策を含めてください。"
書き換えまたは改善する
"
guides/quick-start.mdを読み、短く、よりシンプルにしてください。技術的な背景のない人を対象としてください。"
一度に複数のページを作成する
"次のページを作成してください:
guides/faq.mdには10個の請求に関する質問、api/overview.mdにはREST APIの概要を含めてください。"
Claudeはコンテンツを書き、ファイルを保存します。結果を確認し、必要に応じて調整を依頼してください。

Save and publish your changes#
作業が完了したら、Claudeに次のように伝えます。
"すべての変更をコミットし、GitHubにプッシュしてください。"
Claudeが必要なコマンドを実行します。Docsbookサイトは数秒以内に更新されます。
ドキュメントを接続する#
その後、リポジトリを接続する必要があります。docsbook.io/connect に移動します — このページでは、いつでも GitHub にサインインしてリポジトリを選択できます。
Markdown Basics#
Docsbook は Markdown — テキストの書式設定を制御する簡単な記号のセット — を使用します。 知っておくべきことはすべてここにあります。
テキストの書式設定#
| 入力する内容 | 表示される様子 |
|---|---|
**bold text** |
太字のテキスト |
*italic text* |
イタリック体のテキスト |
~~strikethrough~~ |
|
`inline code` |
inline code |
見出し#
# Large heading (page title)
## Medium heading (section)
### Small heading (sub-section)リスト#
- First item
- Second item
  - Nested item (indent with 2 spaces)

1. First step
2. Second step
3. Third stepリンク#
[Click here](https://example.com)
[Link to another page in your docs](/ja/docs/guides/getting-started/other-page)Images#
コードブロック#
コードを構文ハイライト付きで表示するには、トリプルバッククォートを使用します:
```javascript
console.log("Hello!")
```
Callout / Quote#
> This is a note or important callout.Your Docs Site Structure#
Docsbook は、ファイルの構造とフォルダ構造からサイドバーナビゲーションを自動的に構築します。設定する必要はありません。
| リポジトリ内のファイル | Docsbook のサイドバー |
|---|---|
README.md |
ホーム |
installation.md |
インストール |
guides/quick-start.md |
ガイド → クイックスタート |
api/overview.md |
API → 概要 |
ヒント:
- ファイルとフォルダの名前がページタイトルになります (ハイフンはスペースに置き換えられます)
README.mdがフォルダ内にある場合、そのフォルダのインデックスページになります- 小文字とハイフンを使用した名前が URL に最適です:
getting-started.md→/getting-started